Let the Sun Do the Work with Chlorophyll Prints

15

In need of a break from your photography routine? Experiments are the best intermissions from your ordinary workflow, and what better way to do so with some alternative photographic printing techniques? I found a special yet inexpensive way to conduct an experiment by making my very own leaf photographs through the chlorophyll printing technique.

Making a Chlorophyll Print

This is a super simple and fun way to make contact prints – using plant leaves. Maybe you have tried drying leaves and flowers as a child and noticed how they lose their color as they dry, especially if you leave them in the sun. This photosensitivity can be used to make prints of your pictures.

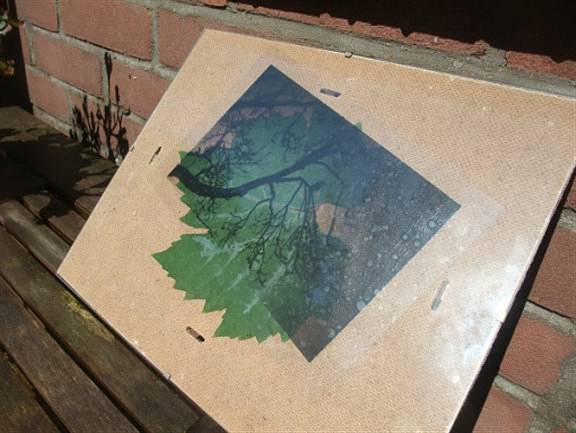
All you have to do is print a high-contrast image onto one of those overhead projector transparency sheets you can get from an office supply store. Then, pick a nice, big leaf from a plant. Put the transparency on top of the leaf in a photo frame. The glass will keep it nice and flat and in place.

Place the frame on a sunny spot and leave it there for a while. If you live in a dry climate, outdoors is fine; if not, put it somewhere in front of a window. Leave it for at least a few days. In time, the color of the leaf will fade, but the bits that are covered by the ink on your transparency will remain darker. After a while, you’ll have a print!

Credits: stratski

Guidelines for Chlorophyll Prints

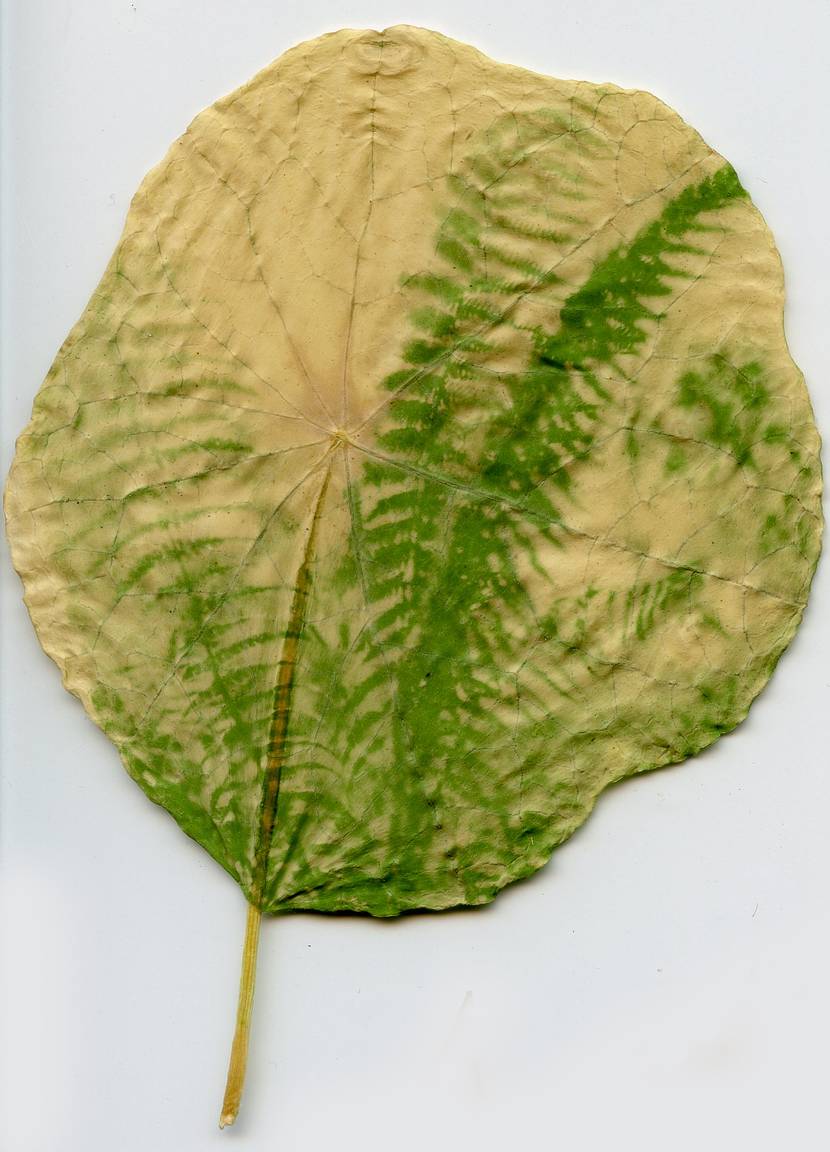
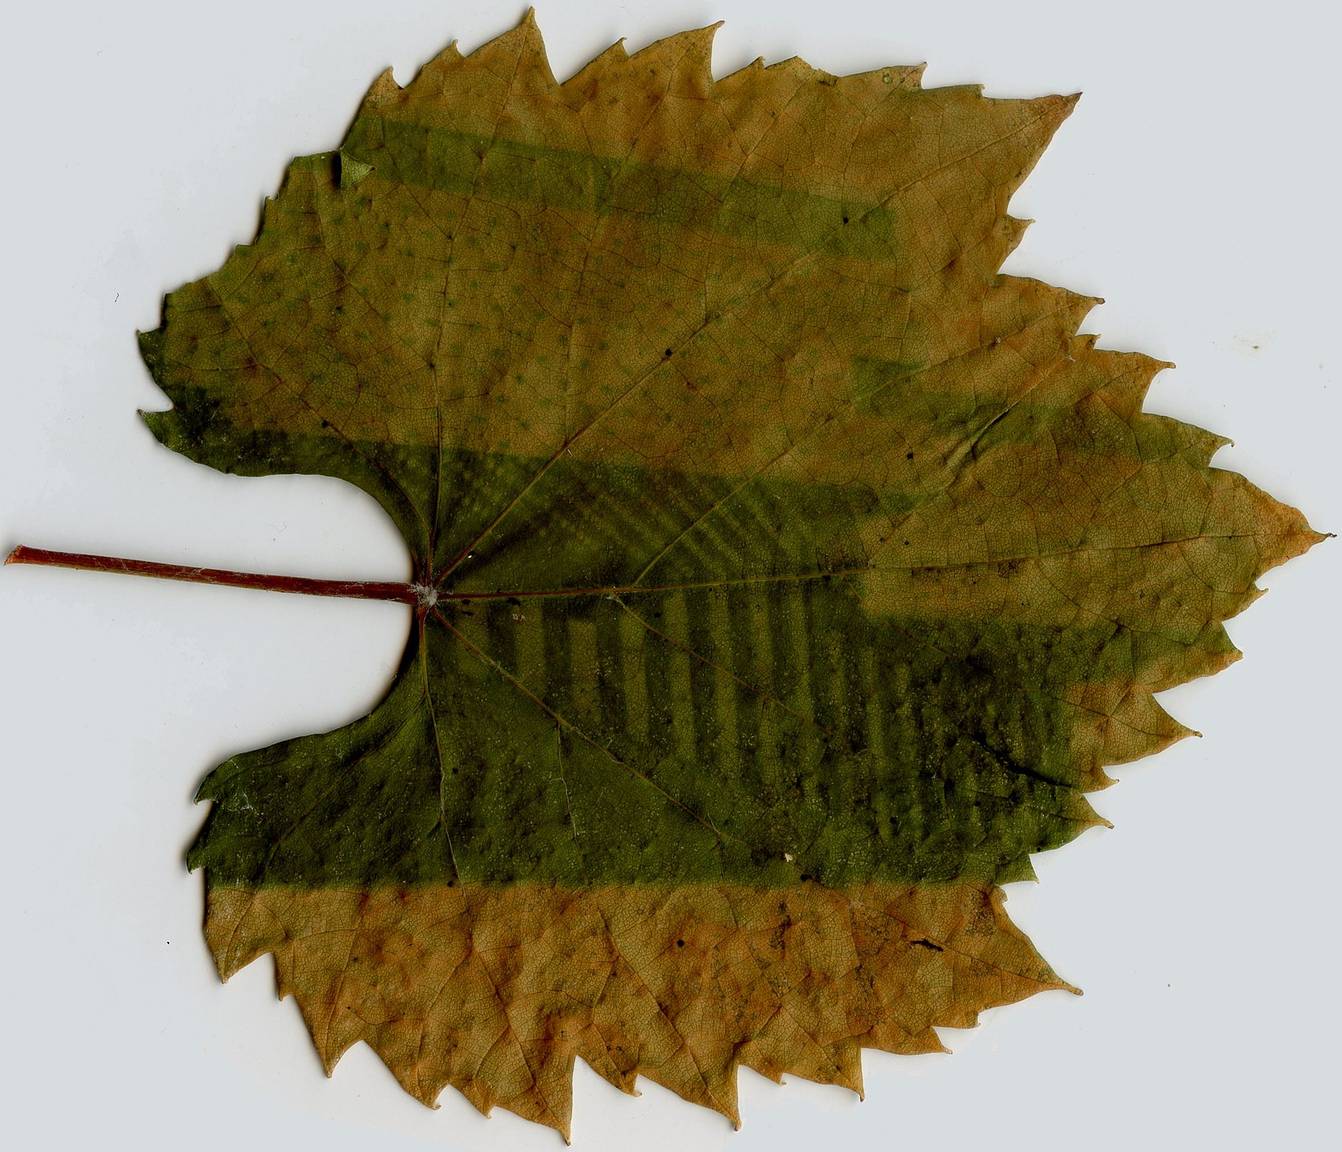
I used vine leaves because I like the typical irregular leaf shape. These produce pale green prints, although one leaf turned reddish. I also used Indian cress, which takes a bit longer until it’s dried all the way, but it produces nice, high-contrast prints on a pale yellow background. I tried dogwood, too, because it was there. It takes pretty long to produce a decent print (about three weeks). The wisteria needs over three weeks, I’ve yet to produce a decent print on it.

Be patient! How long it takes to produce a print varies, depending on the kind of leaf you use and on how strong the sun is. The vine leaves I used took about four to five days. Other types of leaves that I tried took much longer, up to three weeks or more. Experiment with different exposure times and different plants to find out what works for you. A rule of thumb is that it will probably take at least a few days longer than you first estimated.

Try not to look at your print for at least a few days because if you open the frame and move the transparency, it’s very hard to put it back in exactly the same spot. If your image is not ready yet and you accidentally move the transparency, you might create a blurry image. I didn’t wait until my leaf was dried all the way, so now you see only half a radar installation:

Credits: stratski

This technique works best with clear, high-contrast images. The prints will be pretty low contrast so subtle shades of grey will probably get lost. This picture of a fern, for instance, didn’t work very well because the background is a bit too blotchy. It may be a good idea to edit your picture in Photoshop for extra contrast before printing it.

Don’t be too disappointed if you don’t get a good image or no image at all. Just try again with a different kind of plant or a longer exposure time. Once you have some transparencies, making new prints is absolutely free so just go out and pick some more leaves.

You could try using a large format negative as well, but you’ll get a negative picture of course.

If you like your print and want to put it up in a frame, be careful not to put it on a sunny wall because your print will fade in the light. An album is probably a safer place to put it.

Credits: stratski

Curate your leaf prints by uploading them to your LomoHomes. Don’t forget to keep experimenting!

escrito por stratski el 2014-10-09 #equipo #tutoriales #sunlight #leaves #plants #experiment #tipster #requested-post #chlorophyll #darkroom-tips

15 Comentarios

  1. stouf
    stouf ·

    Wonderful! And great results too! I am however wondering about how it actually works. If it had to do with photosynthesis (process through which chlorophyll captures light to produce energy) the exposed parts would be greener. I believe what is happening here is just sun bleaching of the exposed areas on a dying leaf (causing the destruction of chlorophyll pigments -which are green- and therefore a loss of color). Testing it on a leaf still attached to the plant would be a good way to verify this hypothesis : )

  2. stratski
    stratski ·

    @stouf: Thank you! Yes, you're right of course. I just needed a catchy name, that's all ;-) I could argue that the dark bits of the picture are the chlorophyll that's not being bleached away, hence justifying the name.

  3. stouf
    stouf ·

    Oh, I wasn't criticizing anything about your awesome post : ) There are no wrong statements in here since you never said it was using photosynthesis. The name is absolutely justified! I was just clarifying the fact that it is working by bleaching the chlorophyll... I would still be very curious to see the method applied on living leafs (but you would have to use a negative image on the transparency). Thanks again for that refreshing tipster! : )

  4. aguillem
    aguillem ·

    That's so smart and inspirational! It should work with other "materials" as well, as long as they change color with light...
    I love the mill picture.

  5. stratski
    stratski ·

    @aguilem: Yep, you could splash stuff on a bit of paper and produce prints as well. Here's one made with wine: www.lomography.es/homes/stratski/albums/2036567-different-k…
    And this was made with juice squeezed from orange indian cress flowers: www.lomography.es/homes/stratski/albums/2040866-some-more-l…
    Google 'anthotype' and be amazed.

  6. waynejordan
    waynejordan ·

    What an interesting concept! If you wanted to display it, you could probably scan the leaf-print and make a print from that, wouldn't have quite the same effect visually as seeing the print directly on the leaf. Does it seem to make a difference as to which side of the leaf you use?

  7. clownshoes
    clownshoes ·

    very cool. I'm always looking for ways to use lithos.

  8. maxvann
    maxvann ·

    I have a few smaller leaves, they are about the length of a stip of negatives. They are waiting untill next sunday. One has black and white, one slide and one negative. If it works I'll try to post a few, I will also have a look at how it will scan in an regular scanner!

  9. glenn
    glenn ·

    Thank you for posting the video!

  10. gndrfck
    gndrfck ·

    Great experience!
    I read about another method of chlorophyll printing. The leaf is not torn off the tree (or plant), but put into a lighttight bag to let the leaf become yellow (for several days). Then negative is laid on discoloured leaf and fixed with a frame. The leaf still should not be torn off. After some time leaf will become green in those places, where the negative is transparent but will be still discoloured where the negative is opaque. Just when you receive the picture the leaf can be torn off and optionally fixed in blue vitriol dilution (1-2g per 10L of water).

  11. srcardoso
    srcardoso ·

    I really like the results. I'll surely give it a try someday.

  12. chriscreeper
    chriscreeper ·

    i just doing this now maybe i leave it least 2 day

  13. kekskonstrukt
    kekskonstrukt ·

    wow, this is so cool! but why am i reading this now when it's winter and there are no leaves :/ i so wanna try this!
    @stratski awesome article, thanks!

  14. lucia-b
    lucia-b ·

    hello, I'm Lucia, I am very interested in your search, I also make solar prints since 2007, very beautiful yours!
    how can I show to you?
    I would like they can be fixed, do you think you can?

  15. loosetooth
    loosetooth ·

    Can you reuse the acetate to make more prints?

Más artículos interesantes