Let’s do our own scanning! Epson V500

40

Scanning our own film or photos is a blessing! We can save time, money, scan the way we want to and store the files in our computer!

Scanning our own film or photos is a blessing! We can save time, money, scan the way we want to and store the files in our computers!

I have an Epson Perfection V500 Photo scanner and I’m going to show you how I scan film using Epson Scan software.

Let’s double click Epson Scan icon!

I choose the “Professional Mode” ( just in case I want to make some level adjustments), and I’m going to scan color negative film.

- Document Type: “Film” (or Reflective, for photos)
- Film Type: “Color Negative Film” (or positive film, or B&W film)
- Image Type: “24 bit – Color”
- Resolution: 2400 dpi (I’m ok with this resolution)

Usually, I don’t use any adjustment options, such as “unsharp mask” or “dust removal”.

I always uncheck the “Thumbnail” checkbox; thumbnail view is definitely not helpful.

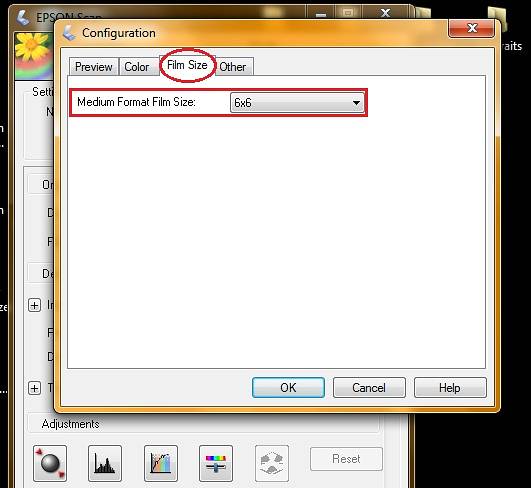
Then I choose “Configuration” where I use these settings.

In the “Preview” tab I check the “Fast Preview” box.

In the “Color” tab I don’t choose “Color control – Continuous auto exposure”. That makes a continuous auto exposure correction every time I expand the area I want to scan.

In the “Film size” tab I choose Medium Format: 6×6.

Time to scan!

First I place my Digitaliza scanning mask on the scanner.

Hit “preview” for a pre-scan image.
Here we see the film with no exposure correction.

Then, I choose the frame I want to scan, but be sure you cover only the exposed area of the film, no sprockets, nothing that’s black, because we don’t want to mess with our auto-exposure.

Hit auto exposure, as you can see, colors pop out immediately!

Then expand the selection, frame it as you want to. It’s now safe to cover the black sprocket holes. The exposure will be maintained.

The same applies to the other frames.

Hold ctrl+mouse button to select all the frames, and hit “Scan”.
Choose the file format and where to save it in the hard drive.

And that’s it! Easy and fast in the comfort of home!

escrito por pepper-b el 2011-03-17 #equipo #tutoriales #negative #35mm #tip #color #scanning #tipster #scan #v500 #software

40 Comentarios

  1. blormore
    blormore ·

    Nice article, thorough with great tips! I love my v500 too! :)

  2. awesomesther
    awesomesther ·

    OMG! Now, I am very sure V500 is the one I wanna buy!!! thank you!! :D

  3. kneehigh85
    kneehigh85 ·

    This is great as I just got a V500. Thanks x

  4. chaotic4life
    chaotic4life ·

    This i really helpful, thank you! I only have a V330, but this will help me tremendously.

  5. dooby
    dooby ·

    awesome! I've been looking at buying one of these and it's just made the decision for me.

    Thanks a mil!

  6. saidseni
    saidseni ·

    Just bought it but I use Linux so no fantastic software for me, I guess... Are you using it with Windows or Mac?

  7. saidseni
    saidseni ·

    Ok, connected to the Mac at work (I think I'll never manage to take it home... :(), Epson software showing... Gonna try it with you instructions, thank you very much! :D

  8. tveden
    tveden ·

    If I may add. Using the auto exposure you will also affect colors, so you won't have the original colors your film produces.
    Also if you scan 48 bit color you will have better bandwidth to adjust exposure. It can save some photos if they got too dark or light.
    Good article.

  9. saidseni
    saidseni ·

    1000 piggies to this lomographer, please! Great article, great job!! :D

  10. superlighter
    superlighter ·

    @saidseni don't worry be happy! becouse Epson software is also for Linux!

  11. shrimpngritz
    shrimpngritz ·

    I had an epson 4490 but just returned it because I couldn't figure any of this stuff out. My bw were coming out soooo bad.

  12. clatter808
    clatter808 ·

    Yep - I use the V500 too - - great for my Spinner360 shots. Two other things - (1) I was having an issue with my film curling the long way in my Digitaliza, so I now flatten my film out under some books before scanning - - and (2) I use some cardboard along one edge of the scanner to keep the Digitaliza straight. For what it's worth...

  13. boogieroxx
    boogieroxx ·

    Thanks for the tip im gonna try it, i have V300 and ive been trying to figure it out im sure this will help!

  14. gittlob
    gittlob ·

    Got one of these they really are awesome for scanning your own negatives

  15. elisss
    elisss ·

    thank you thank you thank you!

  16. elisss
    elisss ·

    thank you thank you thank you!

  17. elisss
    elisss ·

    thank you thank you thank you!

  18. panzergirl
    panzergirl ·

    Thanks PepperB
    I can now scan my negatives with out having to read through all those darned instructions!
    Yay!

  19. blinghaha
    blinghaha ·

    Yay much needed! Thanks!

  20. vivie
    vivie ·

    It's not working :/ I have a v500 epson, but when I try to scan i get an error message:
    Please remove the cover for the transparency unit and/or close the top.
    Could you help me?

  21. vivie
    vivie ·

    I have it! Works (:

  22. gasord
    gasord ·

    really helpful!!! I was stuck and I can see the light thanks to your article!!! thanks a lot!

  23. didiferraz
    didiferraz ·

    It works now!!! Very helpfull article. Thanks for sharing!!!

  24. rhemaangel
    rhemaangel ·

    @vive -- make sure that the white top in the scanner is removed before scanning film. It just slides out of the top. If that's already out, then make sure you aren't covering the little area that the scanner uses to calibrate itself before scanning. Use one of the film guides that came with the scanner to see where the little cutout area is & make sure that area is clear when you put your digitiza on your scanner bed.

  25. moteviolence
    moteviolence ·

    The Epson description says it comes with film holders, so I'm curious if you found them to not work well and that is why you bought the Digitaliza? I have been looking at this scanner and if I don't have to additionally buy negative holders I don't want to spend the extra money, but am looking forward to your reply! Thank you SO much for posting this!! You have been SO, SO helpful in explaining everything!

  26. blinghaha
    blinghaha ·

    @moteviolence The Espon V500 Photo does come with 35mm and 120mm film holders. But if you want to include sprocket holes in your 35mm or the numbers/letters on top of your 120mm then you will need to either lay them out on the scanner without the holders (only works if your negs are flat) or buy the digitalizas which hold the film flat and include sprockets/numbers etc!

  27. ihave2pillows
    ihave2pillows ·

    Thanks pepper-b :) What a wonderfully detailed guide.

    What does the "auto-exposure" actually do? Is it a combination of auto-Levels and auto-contrast? I always wonder what's the "correct" way of scanning my films. I didn't know you can inactivate the "Continuous auto exposure correction" function. That sometimes gave me crazy saturated images, and sometimes changed the tone of my cross-processed film...

  28. mioritza
    mioritza ·

    Thank you for this great article! It helped me a lot when I got the Epson V500.

  29. photomood
    photomood ·

    Great article! I'm planning to buy one, but this does make my decision easier. It does also work on a macbook pro right?

  30. jorgdhondt
    jorgdhondt ·

    Thanks man!

  31. arigatomrrobato
    arigatomrrobato ·

    This article literally saved me from pulling my hair out! Thank you so much :D

  32. m_e
    m_e ·

    this helped so much, thank you :)

  33. asharnanae
    asharnanae ·

    Great artical, well written and very helpful. Thankyou :) I have needed to upgrade my scanner for some time, so I may well go for one of these.

  34. vkichoi
    vkichoi ·

    thanks!!

  35. chrissiea
    chrissiea ·

    I just got my scanner delievered and tried this and it works like a charm. thank you so much for writing this article, it was really helpful!

  36. myfolkway
    myfolkway ·

    Thank you so much, it helped me understand why sometimes I had good results, and sometimes not : I actually did it the right way sometimes, without knowing !
    Most of my photos comes out quite clearly now, but I still have issues on some though, even now I know the right order of actions... Some pictures are like overexposed, altough they aren't on the paper photos from the lab :-(

  37. sibu_sen
    sibu_sen ·

    Very helpful while trying to figure out how to use my new scanner… :)

  38. cpolpa
    cpolpa ·

    thanks my friend!

  39. anamachado
    anamachado ·

    Mine is the v500 but somehow it just doesn't let me select
    Document Type: “Film”
    Seriously sad, just got it!

  40. onnoweb
    onnoweb ·

    Thank you!! This helped me greatly to figure out how to scan my sprocket rocket negatives!

Más artículos interesantes